Solid Surface Worktop Installation Instructions
Before working with solid surface, carry out a risk assessment. Minimise any risks to your Health and Safety and for anyone who may be in the vicinity. This must include the use of the correct Personal Protective Equipment such FFP2 rated dust masks, M class dust extraction for all power tools and adequate ventilation within the work area.
Before commencing any fabrication or installation work, inspect your acrylic solid surface products and ensure you are satisfied that there are no defects, for example: colour matching defects.
A reasonable size of solid surface offcut should be kept for any future colour matched repair work or modifications.
Handling
Solid Surface worktops and breakfast bars are supplied in protective cardboard U-channel protectors on all sides, shrink wrapped in protective film. in sizes 3000 x 650 x 20mm and 2000 x 960 x 20mm respectively. These weigh approximately 75kg each. Splashbacks and upstands are 12mm in thickness and are much lighter in weight.
Solid Surface worktops, breakfast bars and splashbacks must be handled by a team, not alone. Where possible, use handling aids. When moving solid surface worktops by hand, carry it so the shorter edge is vertical. This avoids unnecessary flexing which can cause stress cracks in the material.

Solid Surface worktops can be seamlessly jointed. Please refer to the 'Joining methods' section below. Potentially, a worktop or breakfast bar can be seamlessly jointed to over 6 metres in length. When considering the construction of exceptionally large seamlessly jointed acrylic surfaces, you must plan for the weight and the feasibility of gaining access to the installation area. Solid Surface products should be stored horizontally and supported adequately to prevent any bowing or collapse of the product.
Conditioning
All materials must be given a minimum of 24 hours to meet room temperature prior to installation. This is especially important for adhesives and silicone sealants because temperature affects curing time and consistency.
Removing the protective film
Each solid surface worktop and breakfast bar is supplied with a protective film. Please do not remove the protective film until after machine cutting is finished. After fabrication is complete, remove the protective film in one movement. Do not intermittently stop and start the removal as the film adhesive could then mark the surface. Once the film has been removed, wipe over the entire surface with denatured alcohol to remove any adhesive residues.
Tools and materials required
Solid Surface products can be installed using woodworking tools
- A dust extractor. We recommend the use of an M class extractor.
- Plunging circular saw with fine tooth or solid surface blade.
- 400watt (or above) 1/2 inch router with tungsten carbide cutters including straight 1/2 inch two flute.
- Pendulum jigsaw with a fine-tooth blade or solid surface blade.
- Random orbital sander. Having a 150mm or larger diameter head speeds up the finishing process. Non-random orbital sanders have a sanding pattern which is predictable and can lead to linear or circular marks in the material.
- Electric hand drill with a 12mm drill bit suitable for plastics.
- A hole cutter if fitting tap(s).
- A-Clamps, G-Clamps, F-Clamps or Rapid action clamps. The more clamps you can have available the better, but as a minimum you will require 3 per joint or alternatively a pair of solid surface seaming tools.
- 25 x 25 x 50mm blocks of MDF for the manual joining method.
- A hand sanding block.
- Adhesive gun (both for silicone and 50ml & 250ml solid surface adhesive cartridges).
- Hot melt glue gun.
- Masking tape.
- Colour matched solid surface adhesive. A 50ml cartridge should complete 2no. 630mm joints.
- Silicone adhesive.
Cutting and edge finishing
Solid Surface can be cut in a variety of ways, the most common being with a router, circular saw or jigsaw. Standard woodworking blades can be used; however, there are now blades which are specifically suited to solid surface material. These leave a cleaner finish to the cut which speeds up the finishing process.
We recommend that all cuts are finished with a router as it will leave less tooling marks than other methods. When cutting with a router or circular saw, the cut should be made in several passes to prevent overheating. We recommend cutting 20mm thick solid surface using 4 consecutive passes. The first at 5mm depth, the second at 10mm depth, the third at 15mm depth and the final pass should be greater than 20mm to ensure the cut is complete.
Use of guide rails with cutting tools where possible to maximise the accuracy of the cut. If not using guide rails or if the cutting tool is sliding across the surface of the worktop then you must use masking tape to protect the surface.
Solid Surface expands and contracts very slightly when the ambient temperature changes. Allow 1 millimetre per 1metre of expansion gap wherever solid surface is adjacent to any object (such as a wall) which could prevent this expansion and contraction. For example, 3mm for a 3m long worksurface.
If the cut edge is to form part of a joint, it must first be machined to become square with no rounding of the edge. Care should be taken not to 'round over' the top and bottom of the cut edge: use of a power sander can cause this due to their tendency to 'grab' and their lack of feel. Please refer to 'Joining methods' for more details of this critical process. If the cut edge is visible, then the edge can be finished to match the top surface. Please see the later section 'surface finishing'.
Cut-outs, tap holes, drainer grooves and corners
Cut-outs are needed for sinks, bowls, hobs and electrical sockets. Cut-outs should be a minimum of 75mm from any joint and as far away from any edge as possible, so that the strength of the surface is not weakened. The cut-out should be marked out with masking tape (do not use ink-based pens directly on the surface of the acrylic).
Ensure all measurements are supported prior to any cutting or drilling; even small pieces of solid suface can cause injury. When happy with the positioning and size of the cut-out, drill each internal corner with a 12mm drill bit or larger bit if possible (to suit the sink, bowl, hob or electric socket shape). The smooth curve of the drilled hole instead of a 90°ree; angle prevents stress cracking.
Once all corners are drilled, cut the straight lines to join the drilled corner sections in accordance with the above section 'Cutting & edge finishing'. Where possible use a jig made of compact grade laminate or MDF and a router with a guide bush. Ensure these are clamped securely to the surface. Take care not to get too close to the corners.
If the cut does not reach the corner, finish with a jigsaw. Once the section to be cut out has been removed, use a 150-grit abrasive disc and your hand sanding block to remove any rough cuts. If fitting a hob, use heat reflective tape around the inside edge of the cut-out.
When fitting hobs or inset sinks, it may be necessary to increase the thickness of the material on the underside of the cut out so that the fasteners for the sink or hob do not 'bottom out'. This is achieved by cutting the waste material from the cut out into small blocks and adhering to the underside of the edge of the cut out.
Ensure all hobs are positioned, installed and connected in accordance with the hob manufacturer's instructions and all relevant gas/electrical regulations.
If fitting drawers or a built-under oven below the hob, adjust the drawer box or oven support to accommodate the hob within the worktops 20mm thickness. For the drawers, you will only need to adjust the rails and the mounting plates which are on the rear of the uppermost drawer fascia. Measure how much lower the drawer box needs to be. Then create a copy of the existing mounting holes at the required lower level on the inside of the cabinet side panels and rear of the uppermost drawer fascia. This will lower the drawer box relative to the hob but leave the drawer fascia in the correct position. The oven support panel can be lowered in the same way. However, the oven may need a fascia installed between the top of the front panel of the oven and the underside of the worksurface. Please check your cabinet manufacturer's instructions prior to creating any mounting points.
For tap holes use a hole cutter.
Because acrylic is a solid surface, you can create a 'waterfall' effect by having your drainer groove design moving from a depth of 2mm to 5mm. Elevate the drainer groove template at one end by 3mm. Use a router and radius cutter.
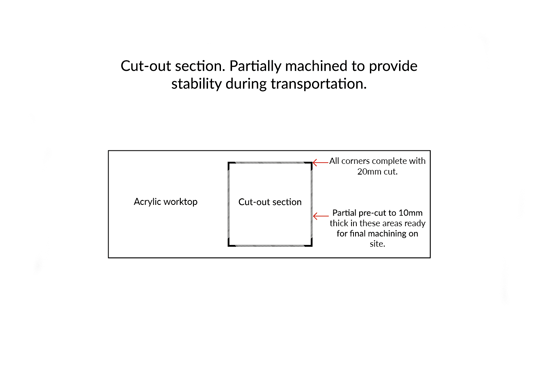
Finishing your partial cut-outs
Shape, position and size has been templated according to the approved fabrication CAD diagram. Radius corners have been cut to the full 20mm depth of the worktop to ensure that the radius is correct on all corners. This is the most complex part of the cut-out. To guide the fitter, the remaining edges have been routed to 10mm depth to act as a guide to complete the cut-out accurately. To finish the edges where required, for example with an undermount sink, please refer to the edge finishing section above.
Cut-outs for hobs and over mounted sinks can be made using a standard jigsaw and blade suitable for use on solid surface worktops. A plunge saw is also a suitable cutting method. The edges can then be sanded to give a smooth appearance. With undermount sinks, as the edges will be visible, a cleaner finish is required. These cut-outs should be made using a router with a 1/2 inch cutter. For cuts that connect with the radius corners, a guide block or rail should be used when cutting, ensuring a straight and accurate cut. Material should be removed using two passes at 5mm deep. Support should be provided under the cutout section to prevent damage and injury.
Unsupported surfaces
If you need to allow your surface to overhang a cabinet (e.g. at a breakfast bar area) do not have an unsupported overhang of more than 150mm. If the overhang exceeds 150mm, use either a continuous steel plate or plywood panel on the adjacent cabinet and under the overhanging worktop.
Joining tools
Suction clamps
Suction clamps are a professional way of levelling two panels and bringing them together for a bonded joint.
MDF blocks
If you are not using suction clamps, hot melt glue 3 MDF blocks on each side of the joint. Then use G clamps to the blocks to bring the 2 panels together.
Joining methods
Butt joining
Solid Surface worktops come with chamfered edges. Square edges can be butt-jointed, however when joining chamfered edges, please see our V-groove joining method.
Inconspicuous joining
Because of the size of the coloured particles in some décors and the veined marbled designs, it can be difficult to create a truly inconspicuous joint. Where an inconspicuous joint is required, please use mitre joint arrangements.
Edges that will be joined together must be machined square. Use clear lamellas to level the two surfaces.
Carry out a trial 'dry fit' with the 2 panels. Inspect correct for any gaps or excessive variation in levels.
The 2 pieces are now separated and thoroughly cleaned. Any marks will mix with the joining adhesive and be seen on the finished job, so the joint must be cleaned throughly using denatured alcohol to ensure a contaminate free joint.
Now apply the 2-part solid surface adhesive. The ambient temperature affects the adhesive drying time: in the cold it takes longer and, in the heat, it's quicker. With the adhesive cartridge in the gun and mixer nozzle fitted, squeeze the adhesive right to the end of the nozzle. Then squeeze a nozzle length out of the mixer onto a piece of scrap material so you are certain the adhesive is mixed. Apply adhesive to both faces of the joint that will contact each other. Apply enough adhesive so that a small amount squeezes out the joint.
Use the suction clamp method or manual method as noted above. Gently and evenly increase the pressure so that the joint comes together. Take a chisel and carefully remove the excess adhesive from the front edge only. Leave the joint to set. Once the adhesive that has squeezed out of the other joint edges has dried and is hard, remove the clamps and MDF blocks or suction clamps.
Now take your random orbital sander with a 150-grit abrasive disc and sand the hardened adhesive. Once the hardened adhesive is level with the surface of the acrylic worktop: stop sanding. The joint will need 'finishing' with the rest of the worksurface, please see the later section 'Surface finishing' for more details.
V - Groove joining
The material should be cut as the advice under the 'Cutting and edge finishing' section with the following additional step. Fit a 45° chamfer tungsten carbide router bit into your router for a chamfer no more than 2mm deep. Any larger than this and it will become a dirt trap and produce too small a contact area between each piece of material. Then apply the 45° chamfer to the solid surface panel which is to form the other half of the joint.
Perform a 'dry fit' to ensure the accuracy of the joint. Then apply clear neutral cure silicone between the 2 cut edges of the material and push the 2 pieces of material firmly and evenly together. Wipe off excess silicone immediately and allow to set.
Edge profiling
The edges of solid surface are supplied by the distributors chamfered with a 2mm diameter to match the factory edge profile. Any tungsten carbide tipped (TCT) router cutter will cut through solid surface. When applying an edge, allow the router and cutter time to cut through the material without excessive pressure to avoid tooling marks which can be difficult to remove
Surface finishing
When the worktop is installed with all the processes complete, sand over the surface to create a consistent finish. We recommend that solid surface worktops installed in kitchens are sanded to no more than 500-grit. 500-grit is more resistant to visible scratches.
Begin by sanding all areas that have been worked on by you. Then move across the entire surface to create a consistently sanded surface. Start with a 150-grit abrasive disc on your random orbital sander using long flowing movements in a North/South and then East/West pattern. Never sand in rapid movements or allow the sander to sit in one spot. Allow only the weight of the sander tool to apply the pressure. Wipe the entire surface with a microfibre cloth to remove any dust. Now, repeat this sanding process with a 240-grit abrasive disc followed by 320-grit and then 500-grit
Once the entire surface has been sanded with a 500-grit to an even, consistent finish, fit a 500-grit Scotch-Brite polishing pad (If you are finishing your solid surface worktop to a higher level than 500-grit, sand the entire surface with 600-grit then 800-grit abrasive discs using the principles described above, before finishing with a Scotch-Brite polishing pad).
It can be difficult to use an orbital sander, such as when the worktop surface is installed next to a tall oven housing unit and where a sink or hob is being fitted. In these difficult areas, carry out the sanding before you fit the sink and hob and before you install the surface into the final position. Then, when the surface has been positioned and the sink and/or hob have been installed, complete the remaining sanding and finishing.
Securing cabinets to acrylic surfaces
Cut blocks of MDF approximately 50 x 18 x 18mm. Apply silicone to top and side of blocks and adhere to the side wall of the cabinet and the underside of the worktop. Should the surface ever need to be removed in the future simply remove the blocks.
Installation of upstands and splashbacks
Solid Surface upstands and splashbacks should not be fixed to the worktop with solid surface adhesive. Instead apply dabs of silicone every 100mm to the wall surface to which the upstand or splashback is to be fitted. Press the upstand or splashback firmly against the wall to ensure a secure bond. You can use masking tape to hold the upstand or splashback in place whilst the coloured silicone sets. A carefully applied continuous bead of silicone is required at the junction of the worktop and upstand or splashback to ensure a waterproof seal.
Solid Surface upstands and splashbacks are finished in the same way as worktops and breakfast bars but carry this process out before fitting as it is difficult to get a consistent finish when they are attached to a wall. Ensure they are adequately supported whilst finishing.
Everyday care
General cleaning of your acrylic solid surfaces can be done by wiping the surface with a damp sponge or cloth and then drying with a dry soft cloth to prevent spotting, especially in hard water areas. A microfiber cloth is the best type to use.
Basic stains
Clean with a mild detergent and a damp sponge or cloth and then rinse with clean water and wipe dry with a soft cloth to prevent spotting. To enhance the visual colour clarity of the surface, apply a commercially available non-abrasive cleaner formulated specifically for solid surfaces and wipe away excess, buffing dry with a soft cloth.
Stubborn stains and minor scratches
Dark décors, especially those with a gloss finish will potentially show signs of use such as scratches more readily than lighter décors. Therefore a gloss finish generally needs much more care and maintenance.
The following instructions are for stubborn stains and minor scratches. Do not attempt to repair deep scratches, chips or burns, instead contact a certified fabricator / installer to carry out the repairs required.
Matt finishes
This is a standard low or no sheen finish recommended for all high use areas. Scrub in a small circular motion with a wet sponge and a non-abrasive cleaner. Darker décors tend to require much more attention than lighter décors. Scrubbing too aggressively may affect the surface texture. Rinse with clean water and wipe dry with a soft cloth. To enhance the visual colour clarity and hide minor scuffs, apply a non-abrasive solid surface cleaner and wipe away excess, buffing dry with a soft cloth.
Satin finishes
This has a slightly higher level of sheen to matt and requires more attention. Lightly scrub the surface in a small circular motion with a wet sponge and a non-abrasive cleaner over the stain or scratch. Darker décors tend to require much more attention than lighter décors. Scrubbing too aggressively may reduce the level of sheen. Rinse with clean water and wipe dry with a soft cloth. To enhance the visual colour clarity and hide minor scuffs, apply a non-abrasive solid surface cleaner and wipe away excess, buffing dry with a soft cloth.
Gloss finishes
This is a higher and reflective sheen that requires the most care and maintenance. ONLY USE non-abrasive cleaners on a gloss finish. Spray a non-abrasive cleaner over the stain and then scrub in a small circular motion with a wet sponge.
Darker décors tend to require much more attention than lighter décors. Scrubbing too aggressively may reduce the level of sheen. Rinse with clear water and wipe dry with a soft cloth. To enhance the visual colour clarity and hide minor scuffs, apply a non-abrasive solid surface cleaner and wipe away excess with a dry soft cloth. If necessary contact a certified solid surface fabricator / installer for more advice.
Heat
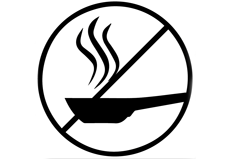
Acrylic solid surfaces have excellent heat resistant properties compared to other work surface products. However, placing hot pans as well as some heat generating appliances such as electric grills or deep fryers can damage the surface. Always use a hot pad or trivet with rubber feet to protect your surface.
Avoid subjecting your acrylic solid surfaces to any source of extreme heat.
Chemicals
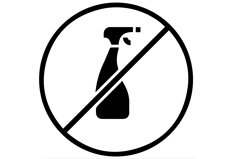
Avoid exposing your acrylic solid surface to strong chemicals such as paint removers, acetone, oven cleaners or drain, stove and toilet cleaning products. Surfaces that have accidentally been exposed to these chemicals should be flushed promptly with water, using appropriate safety measures to avoid injury. Remove nail polish with a non-acetone based remover and flush with water.
Scratches and impact damage
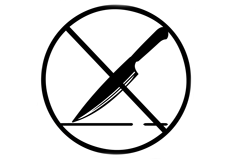
Never cut or chop directly on acrylic solid surfaces, always use a cutting board. Avoid dropping heavy objects on the surface.