
Solid FENIX NTM® Worktop Installation and Maintenance Guide
Solid FENIX NTM® worktops aren't like any other worktops on the market. Created to stand the test of time, these durable surfaces make the perfect choice for a kitchen worktop as they require no treatment prior to fitting and no specialist equipment for installation. This guide is designed to provide you with all the information you require to install and care for your new Solid FENIX NTM® worktop, and to help you keep the surface in pristine condition. Please take the time to thoroughly read this guide before commencing installation as failure to follow it will result in invalidating your warranty.
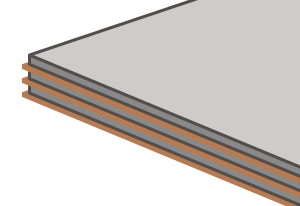
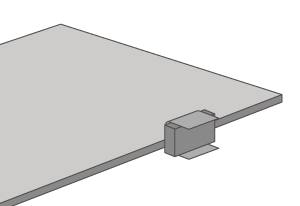
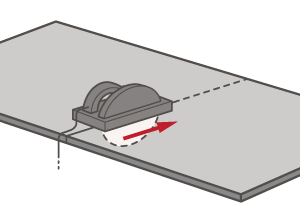
Solid FENIX NTM® Worktops are supplied in shrink-wrapped packaging. Do not discard any of the packaging supplied until you have fully inspected your worktop prior to installation for damages or defects and to ensure you have received the right decor and specification. An installed worktop will be seen as having been inspected and no liability will be accepted for its removal and/or replacement. Please remove the protective films on both sides of the worktop prior to fitting.
Please retain these instructions for future reference.
Whenever cutting, always double check measurements before proceeding..
To ensure the advertised size of the worktop is a completely usable section, Solid FENIX NTM® worktops may be supplied oversized in length by up to 50mm. Therefore, we recommend measuring the length of the surfaces prior to installation and cutting where required.
Solid FENIX NTM® worktops require no treatment prior to installation so we recommend they are fitted as soon as possible following delivery. Should this be impractical, we advise that your worktops are stored flat, face up and supported through their entire length. If you have more than one worktop that needs storing and wish to stack them, please ensure that the surfaces are clean and clear from any debris as there is the potential that this could cause damage through abrasion. We suggest using a layer of cardboard between boards.
- The room humidity is stable.
- All carcases and cabinets are built and fully fitted/complete.
- All building dust and debris has been cleaned and cleared off site.
- All wet trades are finished and a sufficient period of time allowed for natural drying.
- Fresh plasterwork has been allowed to dry for a minimum of 6 weeks or until the plaster is dry throughout.
It is important to ensure you have sufficient manpower to safely lift and handle these worktops - a minimum of 2 people is required and the surfaces should be carried vertically along the width, never flat.
When planning the position of your Solid FENIX NTM® worktop, please note that:
- A minimum gap of 50mm is left between your surface and heat generating appliances, such as an AGA.
- A moisture barrier is advisable for fitted dishwashers, washing machines and tumble dryers.
- The maximum unsupported length of Solid FENIX NTM® surfaces is 250mm
- Overmounted sinks must be placed a minimum of 150mm from any joint seams and at least 40mm from the front of a worktop.
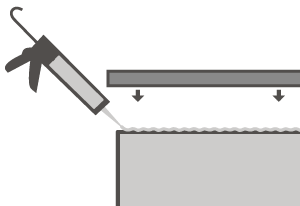
Solid FENIX NTM® worktops should be fixed to base cabinets using a silicone sealant at a minimum distance of 600mm intervals. Screws are not suitable for securing these surfaces in place due to their thickness.
Tiles
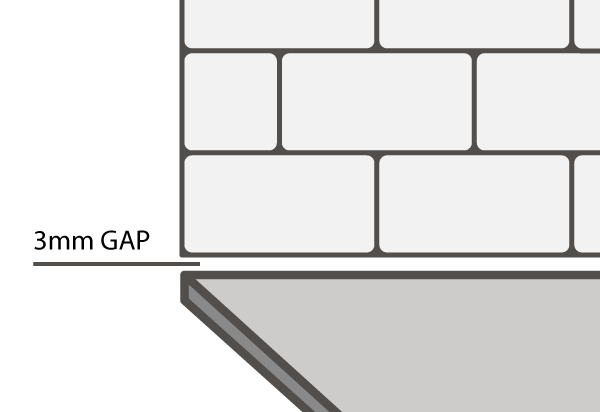
If you'd like to fit tiles above your Solid FENIX NTM® worktop, a small gap of at least 3mm is advisable to allow for the natural expansion of the work surface.
Pipe Holes
If holes need to be cut through the worktop, a space of at least 3mm should be included around the pipe to ensure there is room for the surface to expand and contrast. A silicone sealant can be used to fill this gap.
Edging
Solid FENIX NTM® worktops do not require any kind of edging strips. To finish edges, simply sand with a 240-grit sandpaper to soften the edge and then finish using scotch brite being careful not to sand the surface of the worktop. It is recommended that a small amount of linseed oil is applied to cut edges to achieve a smooth finish.
Solid FENIX NTM® worktops require clean, sharp cutting tools of a good quality to ensure cuts are precise and a professional finish is achieved. When making any cuts in your surface, it is important that it is fully supported.
Cutting to Size
Note: Joint edges and final finished ends will require skimming to size when finished - please allow an additional 2 - 3mm for this.
- The surface to be used should be faced down for cutting.
- Clamp the guide in place to prevent movement when cutting.
- After cutting, dry fit the worktop to ensure no chips or gaps can be seen - repeat steps 1 and 2 if additional adjustments need to be made.
Cut-Outs
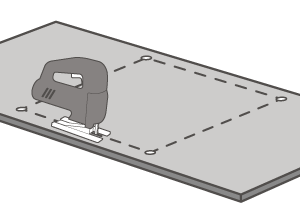
When cutting-out for hobs, sinks or other inset items, double check measurements or use a jig template - ensuring that it is clamped into position to avoid movement. Sharp cutting tools are required to ensure neat cuts. It is also important to support the worktop whilst cutting.
Cutting can be done in two different ways, depending on the visibility of the top edge of the work surface. Cuts that will be hidden (i.e. a cut-out to accommodate an overmount sink) can be started with a drill-hole in each corner of the aperture, and the rest can be cut-out using a hand-held jigsaw, router cutter (12mm or 12.7mm cutter recommended) or a circular saw with a rail guide and TCT triple chip blade.
For cuts that will be visible (i.e. a cut-out for an undermount sink) it is recommended that the work surface is cut face up using a hand router.
It is important to dry fit the item that is being installed into the work surface to ensure a neat finish and good fit. Any issues should arise at this stage and can be rectified before edges are finished.
For cuts that will be visible (i.e a cut-out for an undermount sink) it is recommended that the work surface is cut face up using a hand router.
It is important to dry fit the worktops to ensure a neat finish and good fit. Any issues should arise at this stage and can be rectified before edges are finished.
Installing Hobs
The gap between the bottom of a hob and the item below it will be decreased due to the thickness of a Solid FENIX NTM® worktop. This is not an issue for cupboards, but if an oven or draws are being fitted underneath a hob it is important to ensure that there is ample space between the items. It is not recommended to use a standard depth draw under a hob installed in a Solid FENIX NTM® worktop and for a pan draw to be fitted instead. Single ovens should always be lowered by 20-25mm.
Installing Sinks
Note: Belfast or butler sinks are not recommended for installation with a Solid FENIX NTM® worktop. If this type of sink is being used, please refer to the installation instructions from the sink manufacturer.
With fitting a sink in your Solid FENIX NTM® worktop, spreading dowels should always be used in conjunction with the sink clips to avoid screwing through the worktop (which could cause damage). For undermount sinks, a small bead of silicone should be applied to the face of the worktop around the cut out - any excess will need to be wiped away whilst wet.
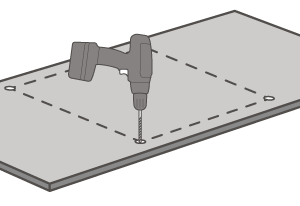
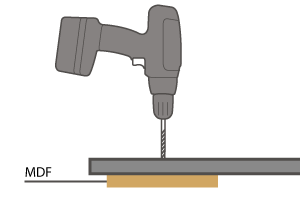
Drilling
When drilling through the worktop completely, a sacrificial piece of MDF should be used on the underside of the hole to prevent flaking. For holes that do not need to go through the worktop completely. It is recommended a 2-3mm gap is left to prevent cracking (i.e maximum hole depth of approximately 10mm).
For tap holes, it is important to follow the manufacturer's instructions to ensure moisture does not enter the tap hole - we recommend using a silicone sealant to seal the tap to the worktop to help prevent this further.
A clear 2-part epoxy resin is needed to bond two worktops together and will also work as a waterproof sealant. Follow the instructions carefully to ensure the correct ratio of hardener to adhesive is used.
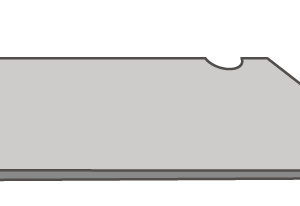
As Solid FENIX NTM® worktops are supplied with a slightly softened edge - worktops can be joined as-is but this will result in a more visible connection. For a more discreet seam, a router can be used to achieve a square edge profile.
A biscuit joint is required to secure Solid FENIX NTM® worktops together, whether a straight connection is being created or a masons mitre joint for a corner being used.
- Apply masking tape along the edge of the joint.
- Mark out slot positions on the masking tape. We recommend 4 biscuits every 635/645/650mm of joint.
- Using a biscuit jointer, machine pockets to fit no. 20 biscuits. The pockets should be cut 4mm from the top face of the surface.
- Once the slot has been cut, make sure biscuits fit.
- Dry fit the two pieces to ensure a good fit - if gaps or chipping are visible, the edges will need re-skimming.
- When a neat finish has been achieved for the dry fit, clean the cut face of each worktop with industrial denatured alcohol and leave to evaporate dry.
- Apply adhesive to biscuit grooves and a small bead along the upper edge of the joint.
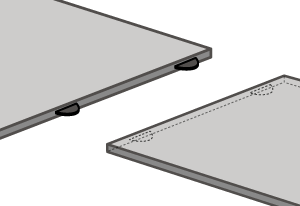
- Connect the two worktops in place and align the surfaces along the top edge. The worktops will need to be held in place using the suction cup method, or with hot melt blocks.
- When the worktops have been secured in place, remove excess adhesive before it hardens for a smooth joint using solvent cleaner.
For a masons mitre joint, the same steps can be undertaken after the worktop has been cut using a jig to achieve a neat finish..
Your FENIX NTM® worktops are designed to withstand regular household use provided that they are maintained and cleaned appropriately. In order to clean your FENIX NTM worktops safely and successfully, please follow these steps:
1. Leaving staining compounds in contact with your FENIX NTM worktops is likely to make any problem worse. Always resolve any spillages quickly by rinsing with warm water and drying with a clean microfibre cloth.
2. If staining does occur, always clean a stain as soon as you notice it. Most simple stains can be cleaned using a damp microfibre cloth and a household degreaser. Once you have removed a stain, always rinse thoroughly using water and a microfibre cloth. You can find more guidance on removing specific stains from your worktop at: https://www.fenixforinteriors.com/en-GB/cleaning/removing-stains/
3. The unique microstructure of FENIX NTM worktops contributes to their unrivalled matt finish. It is therefore important to avoid damaging this microstructure during cleaning by scrubbing, or you risk creating a glossy spot in future. Never use an abrasive cream, scouring pad or hard brush to clean your worktops.
For full guidance on cleaning or maintaining your FENIX NTM worktops, including the thermal healing of superficial micro-scratches, please refer to: https://www.fenixforinteriors.com/en-GB/cleaning/removing-stains
This document gives general recommendations. This document serves as a general guide to good practice and constitutes no form of warranty or representation as to fitness for purpose in respect of the products and processes described in it. Any information or products contained within this document must be verified and tested for suitability by the user for his or her particular purpose or specific application. Consideration needs to be given to local or specific circumstances. The content of this document reflects our knowledge and experience at the time of publication. The information provided in this document is solely indicative. We are unable to warrant the accuracy and completeness of this information. No rights can be derived from the information provided; the use of the information is at your risk and responsibility. This document does not guarantee any properties of our products. We do not warrant that the information in this document is suitable for the purpose for which you consult it. The document does not contain any design, structural calculation, estimate or other warranty or representation that may be relied on. Colours used in our communications (including but not limited to printed matter) and in samples of our products may differ from the colours of the products to be supplied. Our products and samples are produced within the specified colour tolerances and the colours (of production batches) may differ, even if the same colour is used. The viewing angle also influences the colour perception. Customers and third parties must have a professional adviser inform them about (the suitability of) our products for all desired applications and about applicable laws and regulations. We reserve the right to change (the specifications for) our products without prior notice. The newest version of the document replaces all previous versions. We advise that the newest version may contain technical changes that must be taken into account when using the products. The latest version of the document may be consulted on our website. You should always check whether an updated version of the document is available. Any warranty on the products may be voided if the (contents of the) latest version of this document, which may be updated from time to time, is not (properly) followed. We have made every effort to ensure the accuracy of the information in this document, but we cannot be held liable for any oversights, inaccuracies or typographical errors. To the maximum extent permitted under the applicable law, we shall not be liable (neither contractual nor non-contractual) for any damage arising from or related to the use of this document, except if and to the extent that such damage is the result of wilful misconduct or gross negligence on our part. All our oral and written statements, offers, quotations, sales, supplies, deliveries and/or agreements and all related activities are governed by our general terms and conditions. All intellectual property rights and other rights regarding the content of this document (including logos, text and photographs) are owned by us and/or our licensors.
