Compact Laminate Worktop Installation & Aftercare Instructions
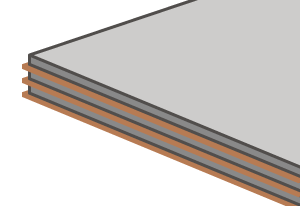
Their solid composition makes compact laminate, also called solid laminate, worktops easy to install and maintain. A compact laminate worktop requires no treatment prior to fitting and requires no specialist equipment for installation. These instructions have been compiled to help you fit your compact laminate worktops correctly to ensure they are secure and that they last as long as possible too. We recommend you read our guide thoroughly before fitting your new surfaces.
Your compact laminate worktops will be delivered in shrink-wrapped plastic packaging - please remove this and dispose of carefully. We recommend that you keep these instructions for your reference.
Please note: Prior to installing your worktops, peel back a small section of the protective film on the surfaces to ensure a perfect colour match of your worktops.
If you have not had any alterations to your worktop, the size may be slightly larger than advertised to ensure the measurements specified upon purchase make up a completely usable section. Please measure your worktop before installing as it may require trimming to meet your size requirements.
Solid laminate worktops require no treatment prior to installation so we recommend that they are fitted as soon as possible following delivery. Should this be impractical, we advise that your worktops are stored flat, face up and supported through their entire length. If you have more than one worktop that needs storing and wish to stack them, please ensure that the surfaces are clean and clear from any debris as there is the potential that this could cause damage through abrasion. We suggest using several layers of cardboard between boards.
- The room humidity is stable.
- All carcases and cabinets are built and fully fitted/complete.
- All building dust and debris has been cleaned and cleared off site.
- All wet trades are finished and a sufficient period of time allowed for natural drying.
- Fresh plasterwork has been allowed to dry for a minimum of 6 weeks or until the plaster is dry throughout.
It is important to ensure you have sufficient manpower to safely lift and handle these worktops - a minimum of 2 people is required and the surfaces should be carried vertically along the width, not flat.
When planning the positioning of your worktop, please note that:
- A minimum gap of 50mm is left between your surface and heat generating appliances, such as an AGA.
- A moisture barrier is advisable for fitted dishwashers, washing machines and tumble dryers.
- The maximum unsupported weight of a compact laminate worktop is 250mm.
- Overmounted sinks must be placed a minimum of 150mm from any joint seams and at least 40mm from the front of a worktop.
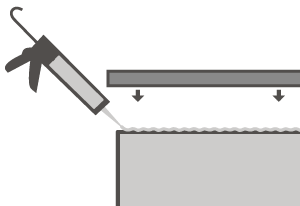
Solid laminate worktops should be fixed to base cabinets using a silicone sealant. Screws are not suitable for securing these surfaces in place due to their thickness.
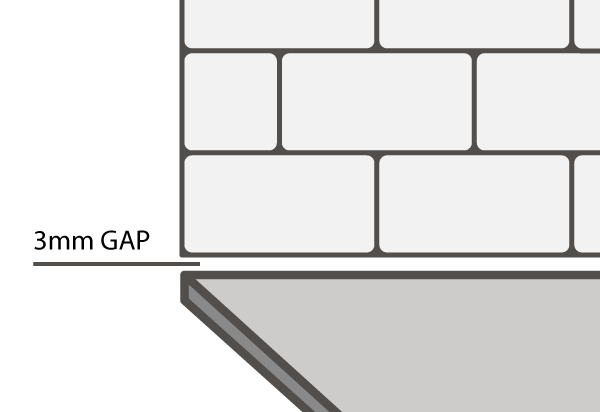
Tiles
If you wish to fit tiles above your compact laminate worktop, a small gap of at least 3mm is advisable to allow for the natural expansion of the work surface.
Pipe Holes
If holes are adjacent to, or, pipe holes have been cut through the worktop, a space of at least 3mm should be included around the pipe to ensure there is room for the surface to expand and contract. A silicone sealant can be used to fill this gap.
Edging
Unlike traditional laminate surfaces, compact laminate worktops do not require edging strips. To finish or re-finish edges, simply sand with 240 grit sanding paper to soften the edge. It is recommended that a small amount of linseed oil is applied to cut edges to achieve a smooth finish.
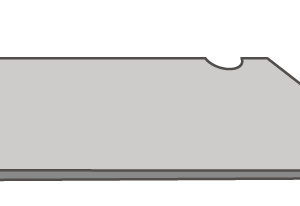
Solid laminate worktops require clean, sharp cutting tools of a good quality to ensure cuts are precise and a professional finish is achieved. When making any cuts in your surface, it is important that it is fully supported
Cutting to Size
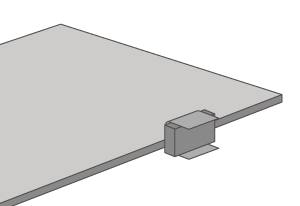
Note: Joint edges and final finished ends will require skimming to size when finished - please allow an additional 2 - 3mm for this.
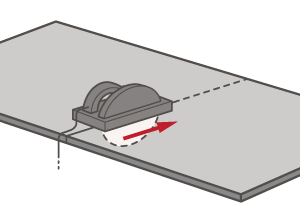
- Clamp the guide in place to prevent movement when cutting.
- Follow markings to cut worktop ensuring a sharp top edge for a smooth connection.
- Dry fit the worktop to ensure no chips or gaps can be seen - repeat steps 1 and 2 if additional adjustments need to be made.
- When a neat dry fit has been achieved, clean the cut for a good bond and neat finish to the joint.
Cut-Outs
When creating cut-outs for hobs, sinks or other inset items, double check measurements and use a jig or template - ensure that it is clamped into position to avoid movement. Sharp cutting tools are required to ensure neat cuts - it is important to support the worktop whilst cutting.
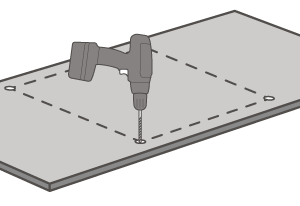
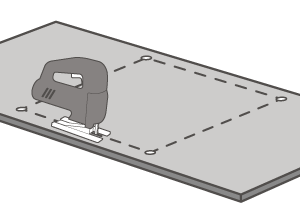
Cutting can be done in two different ways, depending on the visibility of the top edge of the work surface. Cuts that will be hidden (i.e. a cut-out to accommodate an overmount sink) can be started with a drill-hole in each corner of the aperture, and the rest can be cut-out using a hand-held jigsaw, router cutter (12mm or 12.7mm cutter recommended) or a circular saw with a rail guide and TCT triple chip blade.
For cuts that will be visible (i.e. a cut-out for an undermount sink) it is recommended that the work surface is cut face up using a hand router.
Cutting into the core of your compact laminate worktop can reduce water-resistance - when making cut-outs for sinks or drainage grooves, we recommend creating a barrier against water ingress by regularly applying linseed oil to your cut outs. You should also keep the areas clean and dry - more information on maintaining your worktop can be found under the cleaning section of this instruction guide.
It is important to dry fit the item that is being installed into the work surface to ensure a neat finish and good fit. Any issues should arise at this stage and can be rectified before edges are finished.
Installing Hobs
The gap between the bottom of a hob and the item below it will be decreased due to the thickness of a compact laminate worktop. This is not an issue for cupboards, but if an oven or drawers are being fitted underneath a hob it is important to ensure there is ample space between the items. It is not recommended to use a standard depth drawer under a hob installed in a compact laminate worktop and for a pan drawer to be fitted instead. Single ovens should also be lowered by 20 - 25mm.
Installing Sinks
When fitting a sink in your compact laminate worktop, spreading dowels should always be used in conjunction with the sink clips to avoid screwing through the worktop (which could cause damage). For undermount sinks, a small bead of silicone should be applied to the face of the worktop around the cut out - any excess will need to be wiped away whilst wet.
Drilling
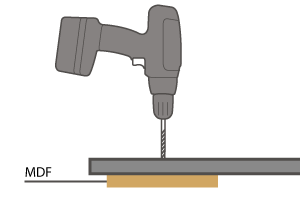
When drilling through the worktop completely, a sacrificial piece of MDF should be used on the underside of the hole to prevent flaking. For holes that do not need to go through the worktop completely, it is recommended a 2 - 3mm gap is left to prevent cracking (i.e. maximum hole depth of approximately 10mm).
For tap holes, it is important to follow the manufacturer's instructions to ensure moisture does not enter the tap hole - we recommend using a silicone sealant to seal the tap to the worktop to help prevent this further.
The TopSeal adhesive provided in our compact laminate installation kits can be used to bond two worktops together and will also work as a waterproof sealant. Single tubes of TopSeal adhesive can be purchased on our website in various colours, including clear.
A clear 2-part epoxy resin can also be used to bond two worktops together, but follow the instructions carefully to ensure the correct ratio of hardener to adhesive is used.
As compact laminate worktops are supplied with a slightly softened edge - worktops can be jointed as-is but this will result in a more visible connection. For a more discreet seam, a router can be used to achieve a square edge profile.
A biscuit joint is required to secure compact laminate worktops together, whether a straight connection is being created or a masons' mitre joint for a corner is being used.
- Machine form pockets to fit no.20 biscuits using a biscuit joint.
- Use masking tape to mark out the slots on the top face of the worktop.
- Cut pockets 4mm from the top face of the surface.
- Once the slots have been cut, make sure biscuits fit.
- Dry fit the two pieces to ensure a good fit - if gaps or chipping are visible, the edges will need re-skimming.
- When a neat finish has been achieved for the dry fit, clean the cut face of each worktop with industrial denatured alcohol and leave to evaporate dry.
- Apply adhesive to biscuit grooves and a small bead along the top surface of the worktop.
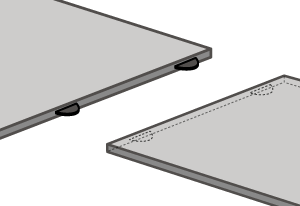
- Connect the two worktops in place and align the surfaces along the top edge. The worktops will need to be held in place using the suction cup method, or with hot melt blocks.
- When the worktops have been secured in place, remove excess adhesive before it hardens for a smooth joint.
For a masons' mitre joint, the same steps can be undertaken after the worktop has been cut using a jig to achieve a neat finish.
Solid laminate worktops are easy to maintain and following these simple steps will help keep them in the best condition for as long as possible.
Although durable and resistant to water ingress, we recommend mopping up any spillages as soon as possible with a clean dry cloth. This is to ensure your worktop remain hygienic and safe to use.
Quick and simple to maintain, compact laminate worktops can be cleaned easily with a mild detergent and water solution before wiping over with clean warm water - gently dry with a clean dry cloth. We recommend further maintaining your compact laminate worktop by regularly oiling and cleaning visible cut outs - use linseed oil to create a barrier against water ingress and a limescale remover to help prevent limescale build up, as this build up can attract stains.
Please note, sanding compact laminate surfaces is not advised and can cause irreparable damage.
Due to their solid, non-porous surface, compact laminate worktops are resistant to stains, mould, mildew and bacterial growth. Any spillages should be immediately wiped clean, however, if discolouration appears use a mild solution of detergent and water to clean the surface.
For more persistent stains, clean with a solution of equal parts domestic bleach and warm water. Non-abrasive cream cleaners can be applied with a non-abrasive nylon brush to more stubborn stains or if all else fails, use a Scotchbrite™ pad and warm, soapy water.
Please use a chopping board when preparing food. Although tough, we recommend that you do not cut directly onto the worktop. Scratches, marks and general wear and tear will be more visible on a darker worktop than a lighter one.
Solid laminate worktops are resistant to heat, however, we strongly advise that you do not place hot pans or dishes directly onto the surface, this may result in lasting damage to the worktop; instead use a pan stand, trivet or hotrods.