

How to Use Jigs with Kitchen Worktops: A Worktop Express® Nutshell Guide
We believe our kitchen worktops are amongst the finest available; and even though we offer a fantastic fabrication service, we appreciate that there are many people who’d like to tailor their timber themselves.
In these ‘DIY’ instances, we would highly recommend investing in one of our worktop jigs – trust us, it will make your life easier. Our jigs start at only £25 and are made from a hardwearing Melamine-faced MDF laminate, which is a superior – and more durable – construction than solid laminate jigs.
Our jigs have a superior peg design that’s designed specifically to eliminate wobbles, as well as a patented closed-bolt design to provide increased stability for mitre cuts. They’ll cut both left and right 45° joints as well as standard 90° joints – perfect for fitting worktops as well as a host of other carpentry situations.

Whether you’ve got a standard 620mm wide worktop or even one up to 900mm wide, we have a jig to suit. We can also supply jigs that are suitable for a whole host of carpentry capabilities including drainage groove jigs, stair jigs, Belfast sink jigs, hotrod jigs and many more!
You might ask yourself: ‘Just how does one use one of these thingy-ma-jigs?’ Well, before you get going, here’s a little list of things you might need to have handy:
- A 12.7mm (½”) router.
- A 30mm Guide bush.
- A Tungsten Carbide Router Cutter (12.7 x 50mm).
- A pair of G clamps.
- Safety equipment including eyewear protection.
Before you start making any cuts, here are some safety precautions to take into consideration:
- Always wear the appropriate eye protection when cutting.
- Ensure that the router’s path is clear of any obstructions.
- Make sure the router’s cable is clear of the jig and worktop.
- The jig should always be properly clamped to the worktop and supported safely and evenly.
- Our jigs are intended to work from left to right, with cuts no deeper than 10-12mm.
- Never remove the router from the jig whilst the cutting tool is still in motion.
Types of Joint
All our worktops are joined together using ‘dog-bone’ butt joints. This type of join means that the two sections of the worktop are held flush together using our worktop connector bolts. This method of joining the two worktops is far superior to any other form of joint because it allows the timber to move – ensuring it won’t bow or twist.
The jig can also be used for joining laminate worktops using a mitre joint, though we would never recommend laminate worktops over solid wood – this material simply doesn’t have the natural qualities of wood, such as unique aesthetic appeal and durability!
Cutting Joints
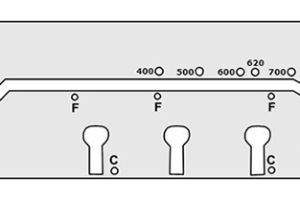
In the diagram above, the holes marked ‘F’ are for use when cutting female mitre joints, whilst those marked ‘M’ are for cutting male mitre joints. Those marked with a ‘C’ are for cutting bolt recesses for butt joints on the reverse side of a worktop. There are numbered holes on the jig that are used to select the correct worktop width (in millimetres).
Always ensure that the worktop sections are fully supported all around. Moreover, be sure that you are supporting the worktop carefully if cutting the end away so that it does not break away prior to the completion of the cut.
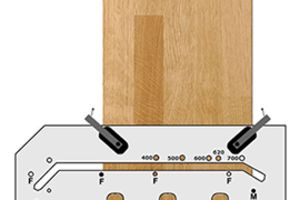
Position the worktop with the top side facing downwards, then use the included pegs to hold the worktop in position. The width of your worktop will dictate which width peg hole to use. Insert two pegs in to the holes marked ‘C’ to ensure that your jig is lined up correctly. Once you are happy that the butt joint templates are positioned correctly, clamp the jig to your worktop – and remember to use a protective layer of wood (such as an offcut) between the clamp and the worktop to protect the worktop from being marked.
If you’re comfortable that your jig is positioned correctly, it’s time to route the holes. Follow the edge of the ‘dog bone’ to cut out the suitable recess. We recommend doing 4 passes at 5mm deep; do too much at once and you risk burning out your router.
Using our jigs makes DIY installation of wood worktops significantly easier, as long as you possess the right accompaniments. Quality routing equipment can be expensive, but if you’re unlikely to use it again after installing your new worktop, it’s worth hiring it from a reputable tool hire company instead.
If, after reading this guide you’ve decided that you’d rather have your worktops professionally fabricated, we can prepare any joints you may require through our worktop customisation service, as well as a variety of other alterations. Prices are extremely competitive, and all worktops subject to any fabrication are also sanded and oiled to give a highly professional finish.
Please feel free to contact us for more information on this and any other worktop-related topic; we’re here to help!