
Solid Wood Worktop Installation & Aftercare Instructions
IMPORTANT NOTE
Our worktops have an 'A' and a 'B' side - it's important you identify these before making any cuts or amendments to your worktops. 'A' has a consistently smooth surface and should face upwards, while 'B' has a slightly rougher surface, may contain small imperfections (neither of which affect the integrity of the worktop) and face downwards.
If you have ordered bespoke or pre-oiled worktops, we have already identified the 'A' and 'B' sides - your worktops will be ready for installation, but remember you must still store your worktops correctly and oil after installation.
Failure to follow the installation instructions given on this page will result in the void of any product warranty.
Wood is a natural material that can be affected by heat and humidity - it can gain and lose moisture before, during and after installation. Wood expands when it is warm or the humidity level is high and contracts during colder periods or when the humidity level drops - when this occurs, it can cause bowing or warping.
This guide is designed to give you all the information you require to install and care for your solid wood worktops - we strongly suggest you spend a short time reading through this guide before you start as our recommendations are required for an effective installation.
Before installing your wooden worktops, we strongly recommend applying two coats of Osmo Top Oil to all its surfaces including the end grains. If you have ordered pre-oiled wooden worktops, you should still use Osmo Top Oil to protect your worktops after installation, but the first initial coat of oil has been applied for you, making them ready to install.
If you are planning on using a coloured TopOil, we recommend ordering one of our standard un-oiled worktops to ensure the pigment is fully absorbed. Because pre-oiled worktops are partly sealed, coloured TopOil will not take with the same effect.
If your wooden worktop is over 6-years old, contact us for specialist care and maintenance advice.
- Do not discard any of your worktop packaging until you have checked all the surfaces.
- Please retain these instructions for future reference.
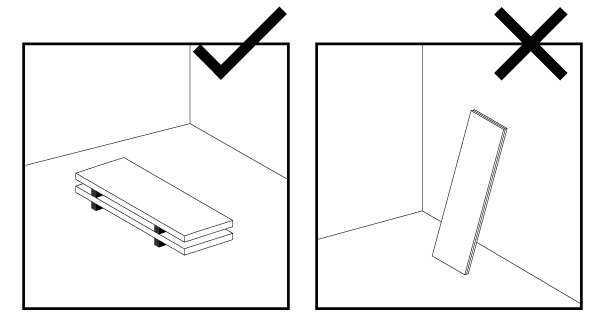
We recommend that worktops are oiled immediately (unless delivered pre-oiled) upon receipt and installed as soon as possible after delivery. If storage is necessary, lay the worktops flat after oiling, fully supported in their original packaging. Worktops must not be placed directly on the floor, but instead separate the floor and the worktop using battens as shown in the diagram below - battens must be used to separate multiple worktops stored together, also shown in the diagram below.
Make sure the storage area is indoors, has a stable humidity and will not be subject to extremes of temperature.
- The room humidity is stable.
- All carcases and cabinets are built and fully fitted/complete.
- All building dust and debris has been cleaned and cleared off site.
- All wet trades are finished and a sufficient period of time allowed for natural drying.
- Fresh plasterwork has been allowed to dry for a minimum of 6 weeks or until the plaster is dry throughout.
Before cutting your worktops, we advise oiling a small area to check they match and you are happy with the result - this is a good time to thoroughly check for any imperfections or bowing before altering your worktop.
Prior to placing the worktops in situ and proceeding with installation, it is important that you oil all the edges and faces at least twice with worktop oil and allow 8-10 hours between coats.
NOTE
Cut edges and areas of end grain will soak up more oil and require additional coats.
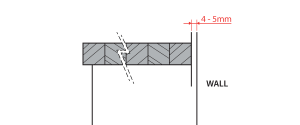
When positioning the worktop, you must allow a 4-5mm gap between all worktop edges and any adjacent walls or units (particularly between the back of the worktop and the wall). Wood is a natural material that can be affected by heat and humidity - wood expands when it is warm or the humidity level is high and contracts during colder periods or when the humidity level drops. By leaving a 4-5mm gap between all worktop edges and any adjacent walls or units, the wooden worktop has room to expand and contract with the humidity of the kitchen without causing damage.
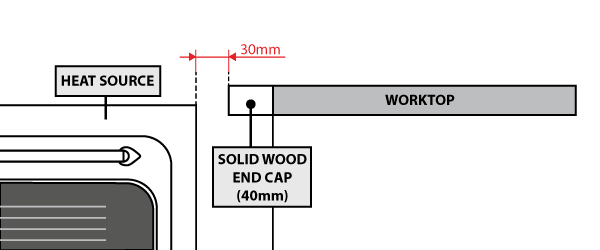
When a worktop is to be fitted near a freestanding oven (i.e. an oven that is not housed in a cabinet, such as a range cooker) allow a minimum gap of 30mm all the way around the worktop and fit a solid wood end cap along the worktop edge to protect the end grain and help prevent splitting.
Special care should also be taken when fitting a worktop over appliances or exposed brickwork. Appliances such as dishwashers, washing machines and microwaves can produce extremes of heat and humidity - if an appliance is to be installed under the worktop, make sure a Moisture Barrier is used to protect the underside - do the same for installations when you are fixing directly onto exposed brickwork.
NOTE
The maximum unsupported overhang on any worktop is 200mm - any greater overhang will require additional support such as Worktop and Breakfast Bar Legs to support the additional weight.
When fixing worktops to cabinets, you must only use slotted angle brackets and a round head screw to fix the bracket. It is important that you use the slot that runs perpendicular to the worktop width (across and not parallel with the grain).
Some cabinets are supplied with brackets that are not slotted - we suggest these should not be used.
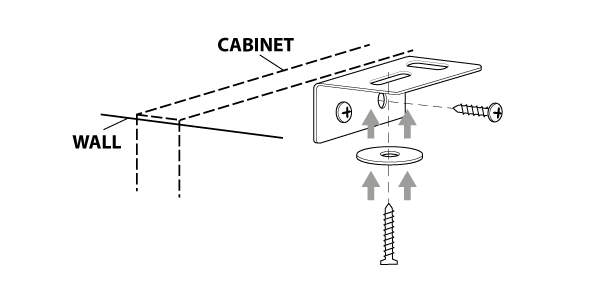
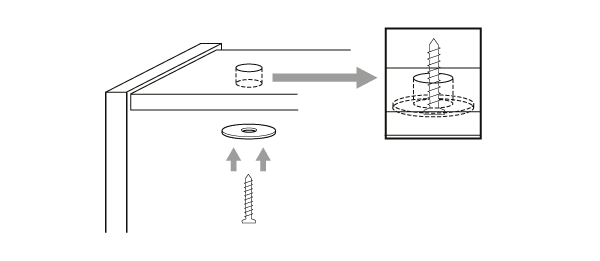
If your cabinets have a solid top or you can only secure through the cross rail, you will not be able to fit slotted brackets - in these circumstances you must drill an oversized hole (8-10mm) through the top of the cabinet carcass and secure the wooden worktop using a larger washer and screw. This will allow the work surface to slide over the washer in case of any possible expansion or shrinkage.
Do not screw through the carcass directly into the worktop - always drill an oversized hole in the cabinet carcass. We suggest you do not use fixing blocks or any worktop fixing methods other than those recommended in this guide.
We suggest that worktops are fitted with an upstand to cover the 4-5mm expansion gap. The upstand must be fixed to the wall and not the worktop. The upstand will hide any possible shrinkage that may occur. An upstand is not required where tiling or silicone will cover the expansion gap.

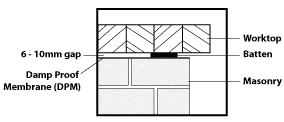
Masonry features
Do not fix wooden worktops directly into masonry - fit them over timber spacers 6-10mm thick with a Damp Proof Membrane (DPM). This prevents the transmission of moisture and provides airspace under the top.
Cupped or bowed surfaces
A different installation (or in some cases re-installation) procedure is necessary should your work surface become cupped or bowed. This is unlikely but can occur as a result of incorrect/prolonged storage or moisture differences on site. If this is the case, the following installation instructions apply:
- 1. Fix the length of the rear of the worktop to the supporting base units.
- 2. Slowly and carefully pull the worktop downwards using clamps and battens.
- 3. Screw down the front edge of the worktop.
NOTE
It can take up to 2 weeks for boxed or cupped worktops to completely return to their flat shape.
Where possible, use the templates supplied with the sink/hob or appliance as a guide for cutting your worktop. Before making any cuts in your worktop, ensure the appliance is marked correctly - when cutting a wooden worktop with a router cutter, this should be done in 10mm increments.
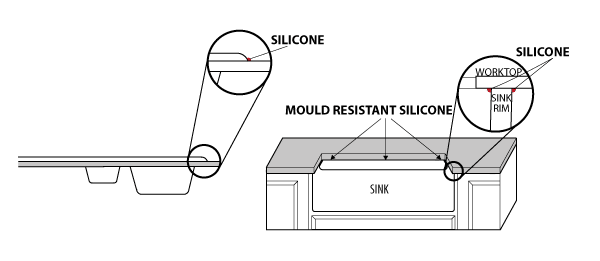
If drainer grooves are required, it is essential that they are machined by an experienced installer or fitter - it is important that the grooves are correctly angled towards the sink to allow any water to drain rather than sit in the grooves. If water does sit in the grooves, it can cause the worktop to split.
When you have fitted a sink to the worktop, seal the area with an appropriate mould-resistant silicone - pay special attention to the underside.
NOTE
For accuracy, quality and safety, all cut-outs should be bench-cut using a jig and suitable router, never a jig saw. You can find a comprehensive range of professional quality worktop jigs on our website here.
Having made all the cut-outs required, make sure that all cut edges are treated with oil as previously instructed in this leaflet - cut edges require more coats than faces.
When joining worktops together, you should use three worktop bolts on each join and seal the end grain at both sides with an appropriate sealer (such as TopSeal) before making the joint.
Seal the join itself with sealer when the worktop parts are finally tightened.
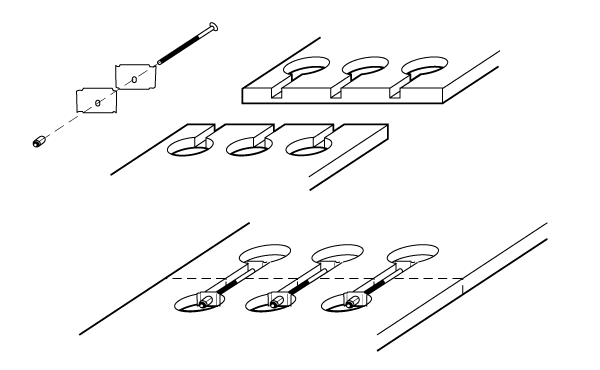
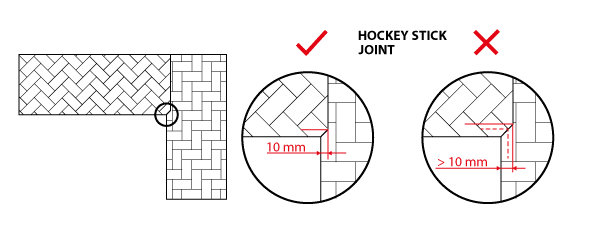
As a rule, only butt joints should be used on wooden worktops - if your worktop has a radius and you do have to use a mitre joint, ensure that the 'hockey stick' does not over extend the 10mm bull-nose radius.
Sealing corner joints
Make sure any end grain has been sealed before assembling the joins. Apply a light bead of clear low modulus silicone sealer along one side of the joint, just below the top surfaces and edges. Align the two sides with biscuits before clamping firmly with worktop bolts. Wipe off any surplus sealant.
Move the tops into place. Use thin pieces of board as temporary packing to position them with 4-5mm expansion gaps between the edges and ends of the tops and the walls.
We recommend finishing our wooden worktops with Osmo TopOil.
Make sure the surface is dry and clean before you begin oiling. Immediately after installation, apply 2-3 coats of Osmo Top Oil to your worktop for optimal coverage and protection, following the instructions on the tin and allowing 8-10 hours between coats. This applies to all wooden worktops including those delivered to you pre-oiled.
Pre-oiled worktops have an initial coating of oil, protecting the surface up to the point of installation only.
For exposed end grains, like sink cut-outs, a third coat is highly recommended for added durability.

If you are using a coloured TopOil, we suggest ordering one of our standard un-oiled worktops to ensure the pigment is fully absorbed during the oiling process. Because pre-oiled worktops are partly sealed, coloured TopOil will not take with the same effect.
Freshly oiled wooden surfaces typically require 2-3 weeks to fully cure and properly harden before they can be used as normal - it's important to be careful with your new wooden worktop during this window.
- Not oiling your worktop can lead to bowing and/or splitting.
- Drying times vary subject to room temperature.
- 500ml of Osmo TopOil per 3 linear metres of worktop recommended
Following these aftercare instructions will help you get the best out of your solid wood worktop - our recommendations are as follows:
Although durable and resistant to water ingress, we recommend mopping up any spillages as soon as possible with a clean dry cloth. This is to ensure your worktop remains both hygienic and safe to use.
Wipe worktops regularly with a damp, but not wet, lint-free cloth and warm water. We do not recommend using multi-purpose cleaning products which contain chemicals as these can cause damage to natural wooden worktops, instead opt for a worktop cleaner.
Avoid the use of scouring pads due to their abrasive nature, if a scouring pad is used the worktop may need to be re-oiled afterwards.
Do not cut directly onto your wooden worktop - place a chopping board or butcher's block on top of the worktop surface for this purpose.
Avoid placing hot, wet or dirty pots and pans directly on the worktop. To protect the surface, always use heat-resistant trivets or stainless steel hot rods. Additionally, metal containers including tin, aluminium, iron, copper and steel can stain the timber, so direct contact should be avoided.
To maintain the fine quality of your solid wood worktop, be sure to oil regularly. Wood is a natural material and a proper course of oil treatment is essential to ensuring a long life.
Within the first few weeks of installation, special care must be taken to prevent the worktops becoming stained before they have built up sufficient oil protection - water must not be allowed to pool or sit on the surface.
When the surface has a sheen and water 'beads' or forms into droplets, the worktop is in good, well-oiled condition. When the surface is dull and droplets do not form, your worktop needs re-oiling.
