Floating Shelves Installation Instructions
- Electronic drill with hammer function / masonry drill
- 10mm masonry drill bit
- Spirit level & pencil
- Tape measure
- Masking tape
- Adjustable spanner or open end 10mm spanner
Step 1:
Start by placing masking tape on the wall where you are planning on positioning your new shelf. Make sure the strip of tape is wide enough to allow you to properly mark the wall.
Step 2:
Next, use the spirit level to mark a straight line across the masking tape with your pencil.

Step 3:
Using your tape measure, find the centre points of the holes on the rear of the shelf, and then mark these points on to your previously-drawn line.

Step 4:
Insert your 10mm masonry drill bit in to the drill and make sure it is held in tightly. Be sure to use eye-protection, then drill a hole of 70mm deep at each point marked. Ensure the drill is straight and that you apply pressure evenly when drilling.

Step 5:
Insert the plastic wall-plug included with the bracket into the holes you've drilled and push in to the wall until flush.

Step 6:
Next, put the washer onto the screw-end of the shelf brackets, and then insert the supports in to the holes, using a spanner to tighten them up sufficiently.

Step 7:
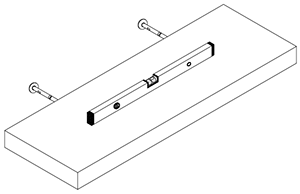
Use a spirit level to ensure that the brackets are pointing out of the wall straight and horizontally, so that you can be sure your shelf will sit flat.

Step 8:
Finally, you're ready to push the shelf on to the brackets. Take care, proceed slowly and check once more with the spirit level to ensure that your shelf is flat. Prior to pushing the shelf against the wall, finely adjust the bracket using the spanner so that the off-set cam rotates and touches the inside of the holes. This holds the shelf in place.

Step 9:
Please take care when installing to ensure that the shelves are mounted at suitable and safe heights (particularly in areas that children may frequent). Similarly, if you feel there is a possibility that you will be storing moderately heavy items on the shelving, or that these will be placed in areas utilised by children, we recommend purchasing additional oak battens for extra support.
Please note: the supplied brackets are designed for installation into masonry, concrete block or timber stud walls only. Ensure that you line up the supports with the studs wherever possible for secure fixing.

 65,000+ Reviews | 4.8 TrustScore