Laminate Worktops Installation & Aftercare Instructions
One major advantage of our high-pressure glued laminate worktops is that they are exceptionally easy to install and maintain. This leaflet is designed to provide you with all the information you require to install and care for your laminate worktop, and to help you keep it in pristine condition. We recommend taking the time to read through this leaflet before commencing installation, so as to ensure your worktop is fitted correctly.
Laminate worktops are supplied in shrink-wrap packaging. Please take care when removing and disposing of packaging as where supplied, edging strips are also enclosed. Please refer to the product page for details on supplied edging strips. Do not discard any of the packaging supplied until you have checked all the parts, and please retain these instructions for future reference.
Please note: Prior to installing your worktops, peel back a small section of the protective film on the surfaces to ensure a perfect colour match of your worktops.
To ensure that the advertised size of the worktop is a completely usable section, laminate worktops may be supplied oversized in length by up to 50mm. Therefore, we recommend measuring the length of the laminate kitchen worktops prior to installation and trimming if required. You must have adequate support for the worktop by supporting every metre on the length, 200mm on the width and maximum unsupported overhang is 200mm.
We recommend installation is carried out as soon as possible after delivery after allowing the worktop to acclimatise for approximately 24 hours. If a longer period of storage is necessary, the worktops must be laid flat and fully supported in their original packaging. Worktops must not be placed directly onto the floor, instead separate the floor and the worktop with battens or pallets as shown in the diagram below. Battens must also be used to separate multiple worktops stored together, also shown in the diagram below.
Make sure the storage area is indoors, has a stable humidity, and will not be subject to extremes of temperature.

- The room humidity is stable.
- All carcases and cabinets are built and fully fitted/complete.
- All building dust and debris has been cleaned and cleared off site.
- All wet trades are finished and a sufficient period of time allowed for natural drying.
- Fresh plasterwork has been allowed to dry for a minimum of 6 weeks or until the plaster is dry throughout.
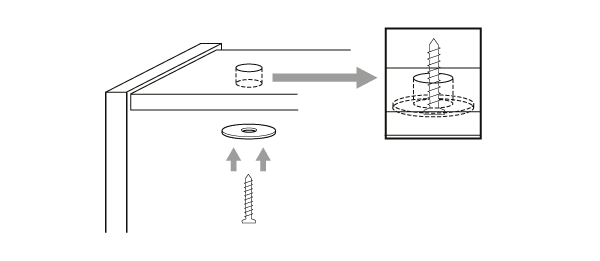
When fixing laminate worktops to cabinets, position the fixings at even intervals - three screws at the back and front of each unit are recommended. Use a 4mm gauge drill bit to make clearance holes through the support panels on each cabinet. Place your laminate worktop on top of the cabinets, and check that it fits flush against the wall. Screw a 5mm x 35mm wood screw through each fixing position.
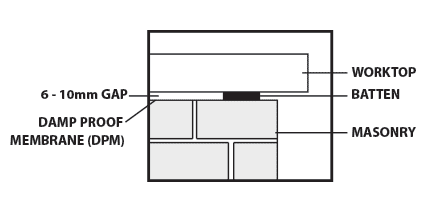
Do not fix laminate worktops directly onto masonry. Use timber spacers measuring 6-10mm thick, with a Damp Proof Membrane (DPM) beneath. This prevents the transmission of moisture and provides airspace under the top, so that the composite fibreboard is not compromised.
Tiles
If you are fitting tiles above the work surface, be sure to leave a space of at least 3mm between the worktop and the bottom row of tiles. This will allow for easy removal of the worktop if necessary.
Pipe Holes
If holes have been cut through the worktop to accommodate pipes, a 2-3mm allowance for expansion/contraction should be allowed around the pipe. This gap can be filled with a silicone sealant.
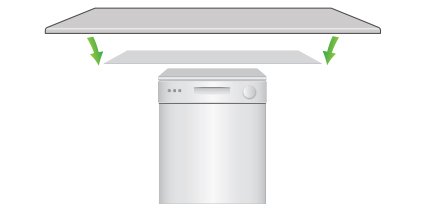
Dishwashers and Washing Machines
When installing a dishwasher or washing machine, ensure that a protective moisture barrier is fitted correctly to the underside of the worktop. These are sometimes supplied by the appliance manufacturer, or can be purchased directly from Worktop Express®.
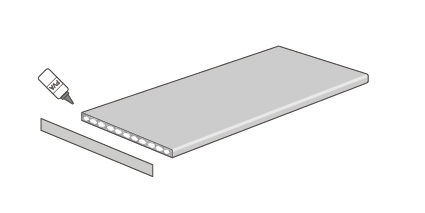
Edging Strips
Ensure that the cut edge of the worktop is flat and free from dust before attaching the matching edging strips, which are provided with many of our laminate worktops. Edging can be attached by applying PVA adhesive - or an all-purpose contact adhesive such as Evo-Stik or Bostik - directly to the fibreboard edge. We strongly recommend covering the relevant areas of the decorative worktop surface with masking tape; this will protect the surface from any overspill of adhesive. If using PVA, the edging strip should be clamped in place while it dries.
Trim any excess from the edging strips (with a laminate trimmer or a sharp carpenter's plane) and use a fine-toothed file to smooth the edge until flush with the worktop.
Cutting to Size
All cutting tools should be sharp, and safety goggles and a dust mask should be used whenever cutting laminated surfaces.
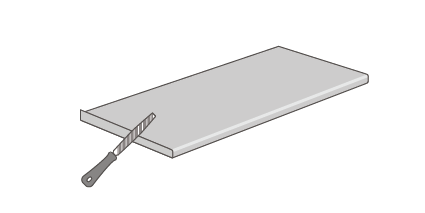
The best results will be achieved by cutting the worktop with a tolerance of +5mm, using a portable power saw (with the decorative side face down) or with a hand saw (decorative side face up). To finish the edge, use a portable hand router, straight edge and 'G' clamps. Clamp the straight edge to the worktop and ensure the cutter enters at the post-formed edge which will result in a perfectly straight, chip-free cut.
Our staff can advise on a comprehensive range of professional-quality worktop jigs; please enquire for further information.
All cut edges must be sealed with a water-resistant material, such as silicone.
Cut-outs for Hobs, Sinks, etc.
When making a cut-out for a sink, hob or other inset worktop appliance, use the template supplied as a guide for cutting your worktop.
Any cut-outs should be carefully measured and marked. Working from the decorative surface, drill through all the corners using at least a 10mm diameter drill bit (sharp internal corners can lead to cracks forming in the laminate surface). Cut-outs can be made using a portable hand router, as explained above.
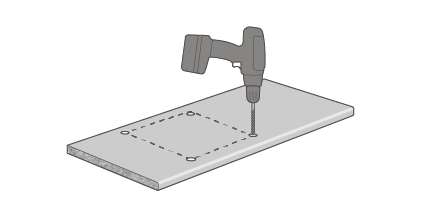
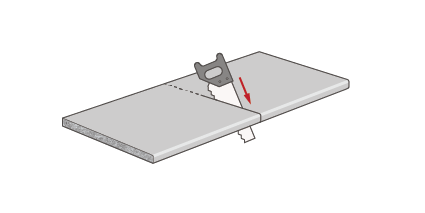
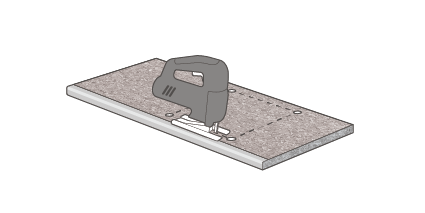
Alternatively, a jig saw can be used, providing that the four corners have been pre-drilled using a 10mm drill bit. Mark out the area to be cut on the decorative side of the worktop and drill a hole in each of the four corners of the cut-out. Then, turn the worktop over and mark a straight line from one hole to another. Use a jig saw with a fine-toothed blade to cut from hole to hole. Ensure the section to be cut out is well supported on the final cut.
Make sure that all exposed edges are sealed with a silicone sealant. If you have fitted an overmounted sink to the worktop, seal around the sink with an appropriate mould-resistant silicone, to prevent water ingress that will swell the fibreboard.
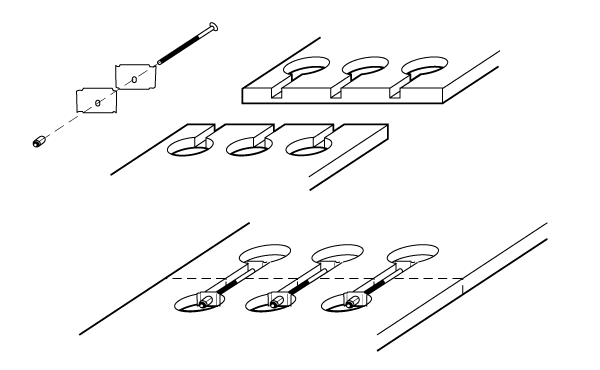
When joining two laminate worktops together, we recommend using either a 90° standard joint or a 45° degree mitre joint depending on worktop layout. Bolt apertures should be cut on the underside of the worktop using a jig and should be no deeper than 25mm from the underside face. For a 600mm deep worktop three bolts are recommended, and four bolts for a 900mm deep worktop.
For further details, please refer to our worktop jig instructions.
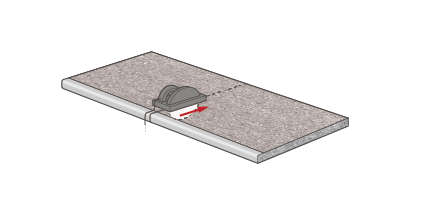
To ensure a permanent and watertight joint, a suitable sealer should be used on the worktops. We recommend either a standard clear silicone sealant or a colour matched Unika ColorFill joint sealant. This should be applied to both joint ends prior to connecting the worktops together.
Following a few easy steps will help keep your worktop in the best possible condition. Our recommendations are as follows:
Be sure to mop up any spillages immediately with a clean dry cloth. Ensure no excess water is left around areas where there are cuts, joint or holes. Do not leave damp cloths, sponges or any other wet items on the top front edge of the worktop, as this area is more susceptible to water ingress.
General cleaning of the surface requires only a damp cloth and a mild detergent or non-abrasive cleaner diluted with warm water.
Abrasive scouring powders, creams and polishes should be avoided. Potentially-persistent stains should be removed immediately. Buff the worktop after cleaning with a soft cloth.
Light Stains or Dirt
Clean with dry or damp paper towels, a cloth or a sponge.
Normal Stains or Dirt
E.G. fat, oil and dirt particles, finger-marks, lime deposits, rust, juice, coffee, tea, wax, blood, universal marker, etc.
Clean with a cloth or soft nylon brush and washing-up liquid, soft soap, liquid soap or washing powder. If necessary, leave for a while and then rinse thoroughly with clean water.
Heavy Stains or Dirt
E.G. discoloration through long exposure to tea, coffee, fruit juice, etc.
Clean with washing powder and household bleach (but do not repeat too often).
E.G. lead pencil, felt-tip pens, marker and ball-point pens, lipstick, crayons, wax, shoe polish, nicotine, nail varnish.
Clean with an organic solvent such as acetone (nail varnish remover), methylated spirits, petroleum spirit or perchloroethylene. Please read the manufacturer's instructions carefully!
E.G. paint (water or solvent-based paints, two-component paints, spray paints), varnish stains, printing ink.
Clean with water or organic solvent. Remove two-component paints immediately.
E.G. adhesives (water-based, dispersion)
Clean with water or an organic solvent.
Do not cut directly onto the worktop as this can result in scratches. Place a chopping board, butcher's block or worktop saver on top of the surface for this purpose. Please be aware that gloss worktops will show scratches, cuts and heat damage more prominently than a standard matt worktop.
Do not place hot pans or dishes directly onto the worktop. We recommend using a pan stand, or trivet, for this purpose.